First Step to Learning Vue JS - 3
Display Hello World and custom message using two-way data binding
I am a Front end developer currently working on React JS, HTML, CSS, Python, Vue JS, Webpack, Babel, AEM etc.
As part of this blog, let's see how to get started with Vue JS -3. Just like any other tech stack, the first step is to print a hello world, as much as anyone can say that it is the easiest thing. But that first step can be overwhelming for anyone who is very new to programming. Hence this blog post.
Project Structure
- index.html
- script.js
index.html
There are 3 things that need to be done, in order to get our HTML running
- Include the VUE-JS package
- Add a div placeholder to display our static message "Hello World"
- Include our custom Vue JS script which is going to hold our "Hello World" message
1. Include the Vue Js package
The first step to starting with a Vue project is including the Vue package. As part of this simple project I am going to include the below script tag in the head section of the HTML. If you are planning to use it in production, probably would want to consider using versioned resources.
<script src="https://unpkg.com/vue@next"></script>
2. Add a placeholder div
Include a div with the id "hello". This id will be used in our custom script and inside this is where you will display the message from the custom script
<div id="hello">
     <h1> Display my message here</h1>
</div>
3. Include the custom Vue JS script
Create a file called script.js inside which we will write our script to display our static message, and this file should be included as the last thing in the body section. The main reason to include this as the last item is, the script gets included in the sequential order.
<body>
        <div id="hello">
          <h1> Display my message here</h1>
        </div>
        <script src="script.js"></script>
 </body>
Why should the script be included at the end of the body?
So let's assume if this script was added in the head section, what happens is, the Vue js package script first gets executed, and the next script to execute will be the script.js. Script.js has code that looks for the div with id=hello and it will throw an error. This is because, the div hello is added after the script in the body section, hence it will not be available yet for the script to push the custom message into that div.
Hence include the script.js as the last file in the body, so that the DOM is available when our custom script executes.
script.js
In the below script
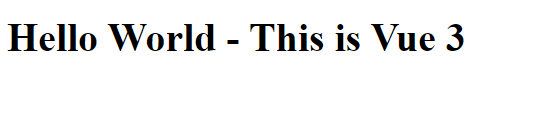
- Create helloWorld, which when called will return the message "Hello World - This is Vue 3"
- Next create a Vue App, which calls the helloWorld which in turn will return the message and insert it inside the div with the id hello.
## Final Script
const helloWorld = {
  data() {
    return {
        message: "Hello World - This is Vue 3"
    }
  }
}

Vue.createApp(helloWorld).mount('#hello');
Now save the above script file and what do you see?. Nothing yet, you will still be seeing the h1 with the value "Display my message here" that is because we need to access the message in the HTML. This can be done using text interpolation. Replace the dummy message with {{message}}
 <div id="hello">
         <h1>{{ message }}</h1>
  </div>
Final HTML
<!Doctype html>
<html lang="en">
    <head>
        <meta charset="utf-8">
        <meta name="viewport" content="width=device-width, initial-scale=1">

        <title>Hello World Vue - 3</title>
        <script src="https://unpkg.com/vue@next"></script>

    </head>
    <body>
        <div id="hello">
          <h1>{{ message }}</h1>
        </div>
        <script src="script.js"></script>
    </body>
</html>
Now save the above Final HTML and Final Javascript, when you open the HTML in the browser you should be seeing the below output
Bonus
Well, we saw how to display a static message, how about trying to get the input from the user and display that message instead.
I am going to include a v-model directive, which accepts input from the user, and as and when the user types, the message gets displayed on the page. This is called two-way data binding, this can be done by just updating the HTML as below
<div id="hello">
     <h1>{{ message }}</h1>
     <input type="text" v-model=message  />
 </div>
Output
References - Vue JS Docs
Follow me on Twitter | LinkedIn for more web development related tips and posts. Feedbacks and suggestions are welcome.
Checkout my other blog post series